

We’ve wanted solar for at least the past 5 years. We even went so far as to get quotes 5 years ago and then decided against it when we didn’t feel we were going to be able to secure as good a deal as we were hoping we could get. We weighed options of financing and leasing and nothing seemed right for the long term. We’re refinancing our house, and decided to use some of our equity in the house to pay for solar since the prices are looking good right now.
Selecting the system
Just for comparison’s sake, when we previously looked at solar, the best deal at the time we were able to find was a 12.48 kW system from SunRun that would be leased over the course of 20 years. The total cost after all was said and done was going to be $48k in lease payments. I could prepay the lease for $31k, or buy it outright for $52k (before credits). This did not include any storage, it was solar only. Additionally, it used lower quality panels (REC Solar REC260PE) and multiple ABB inverters (ABB doesn’t even make them anymore, they exited the inverter business). I’m glad we dodged a bullet on that one.
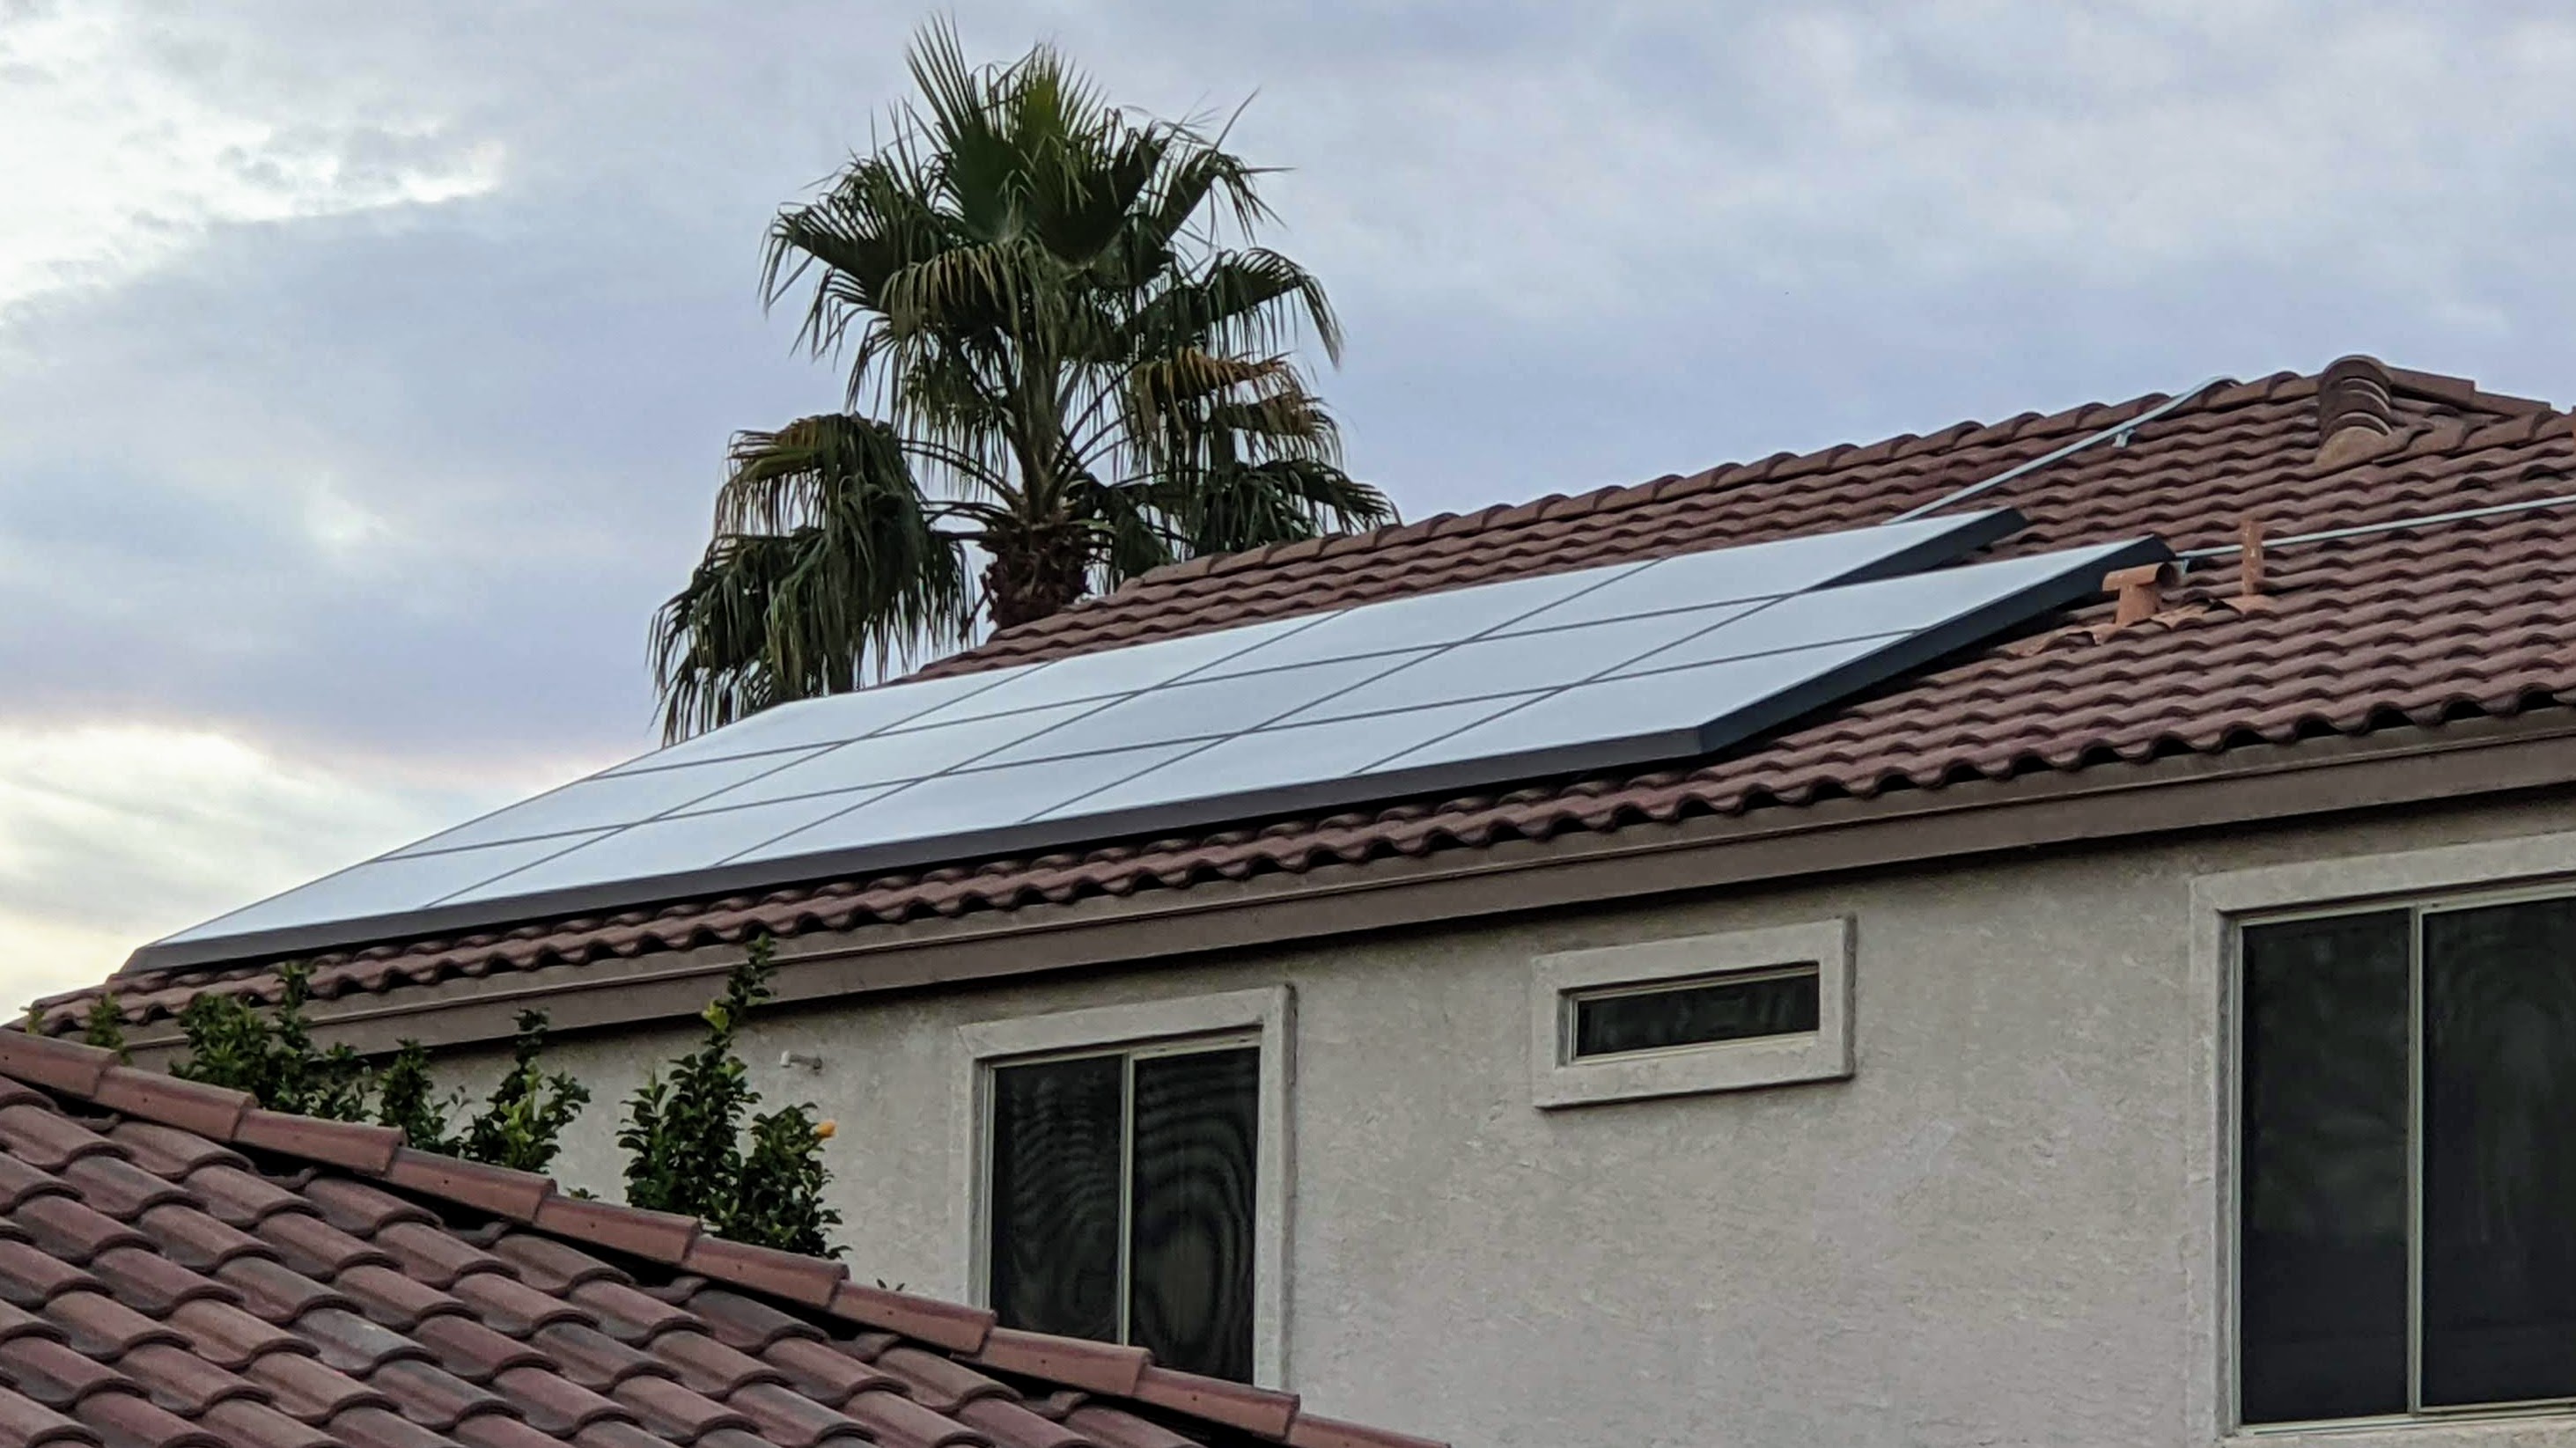
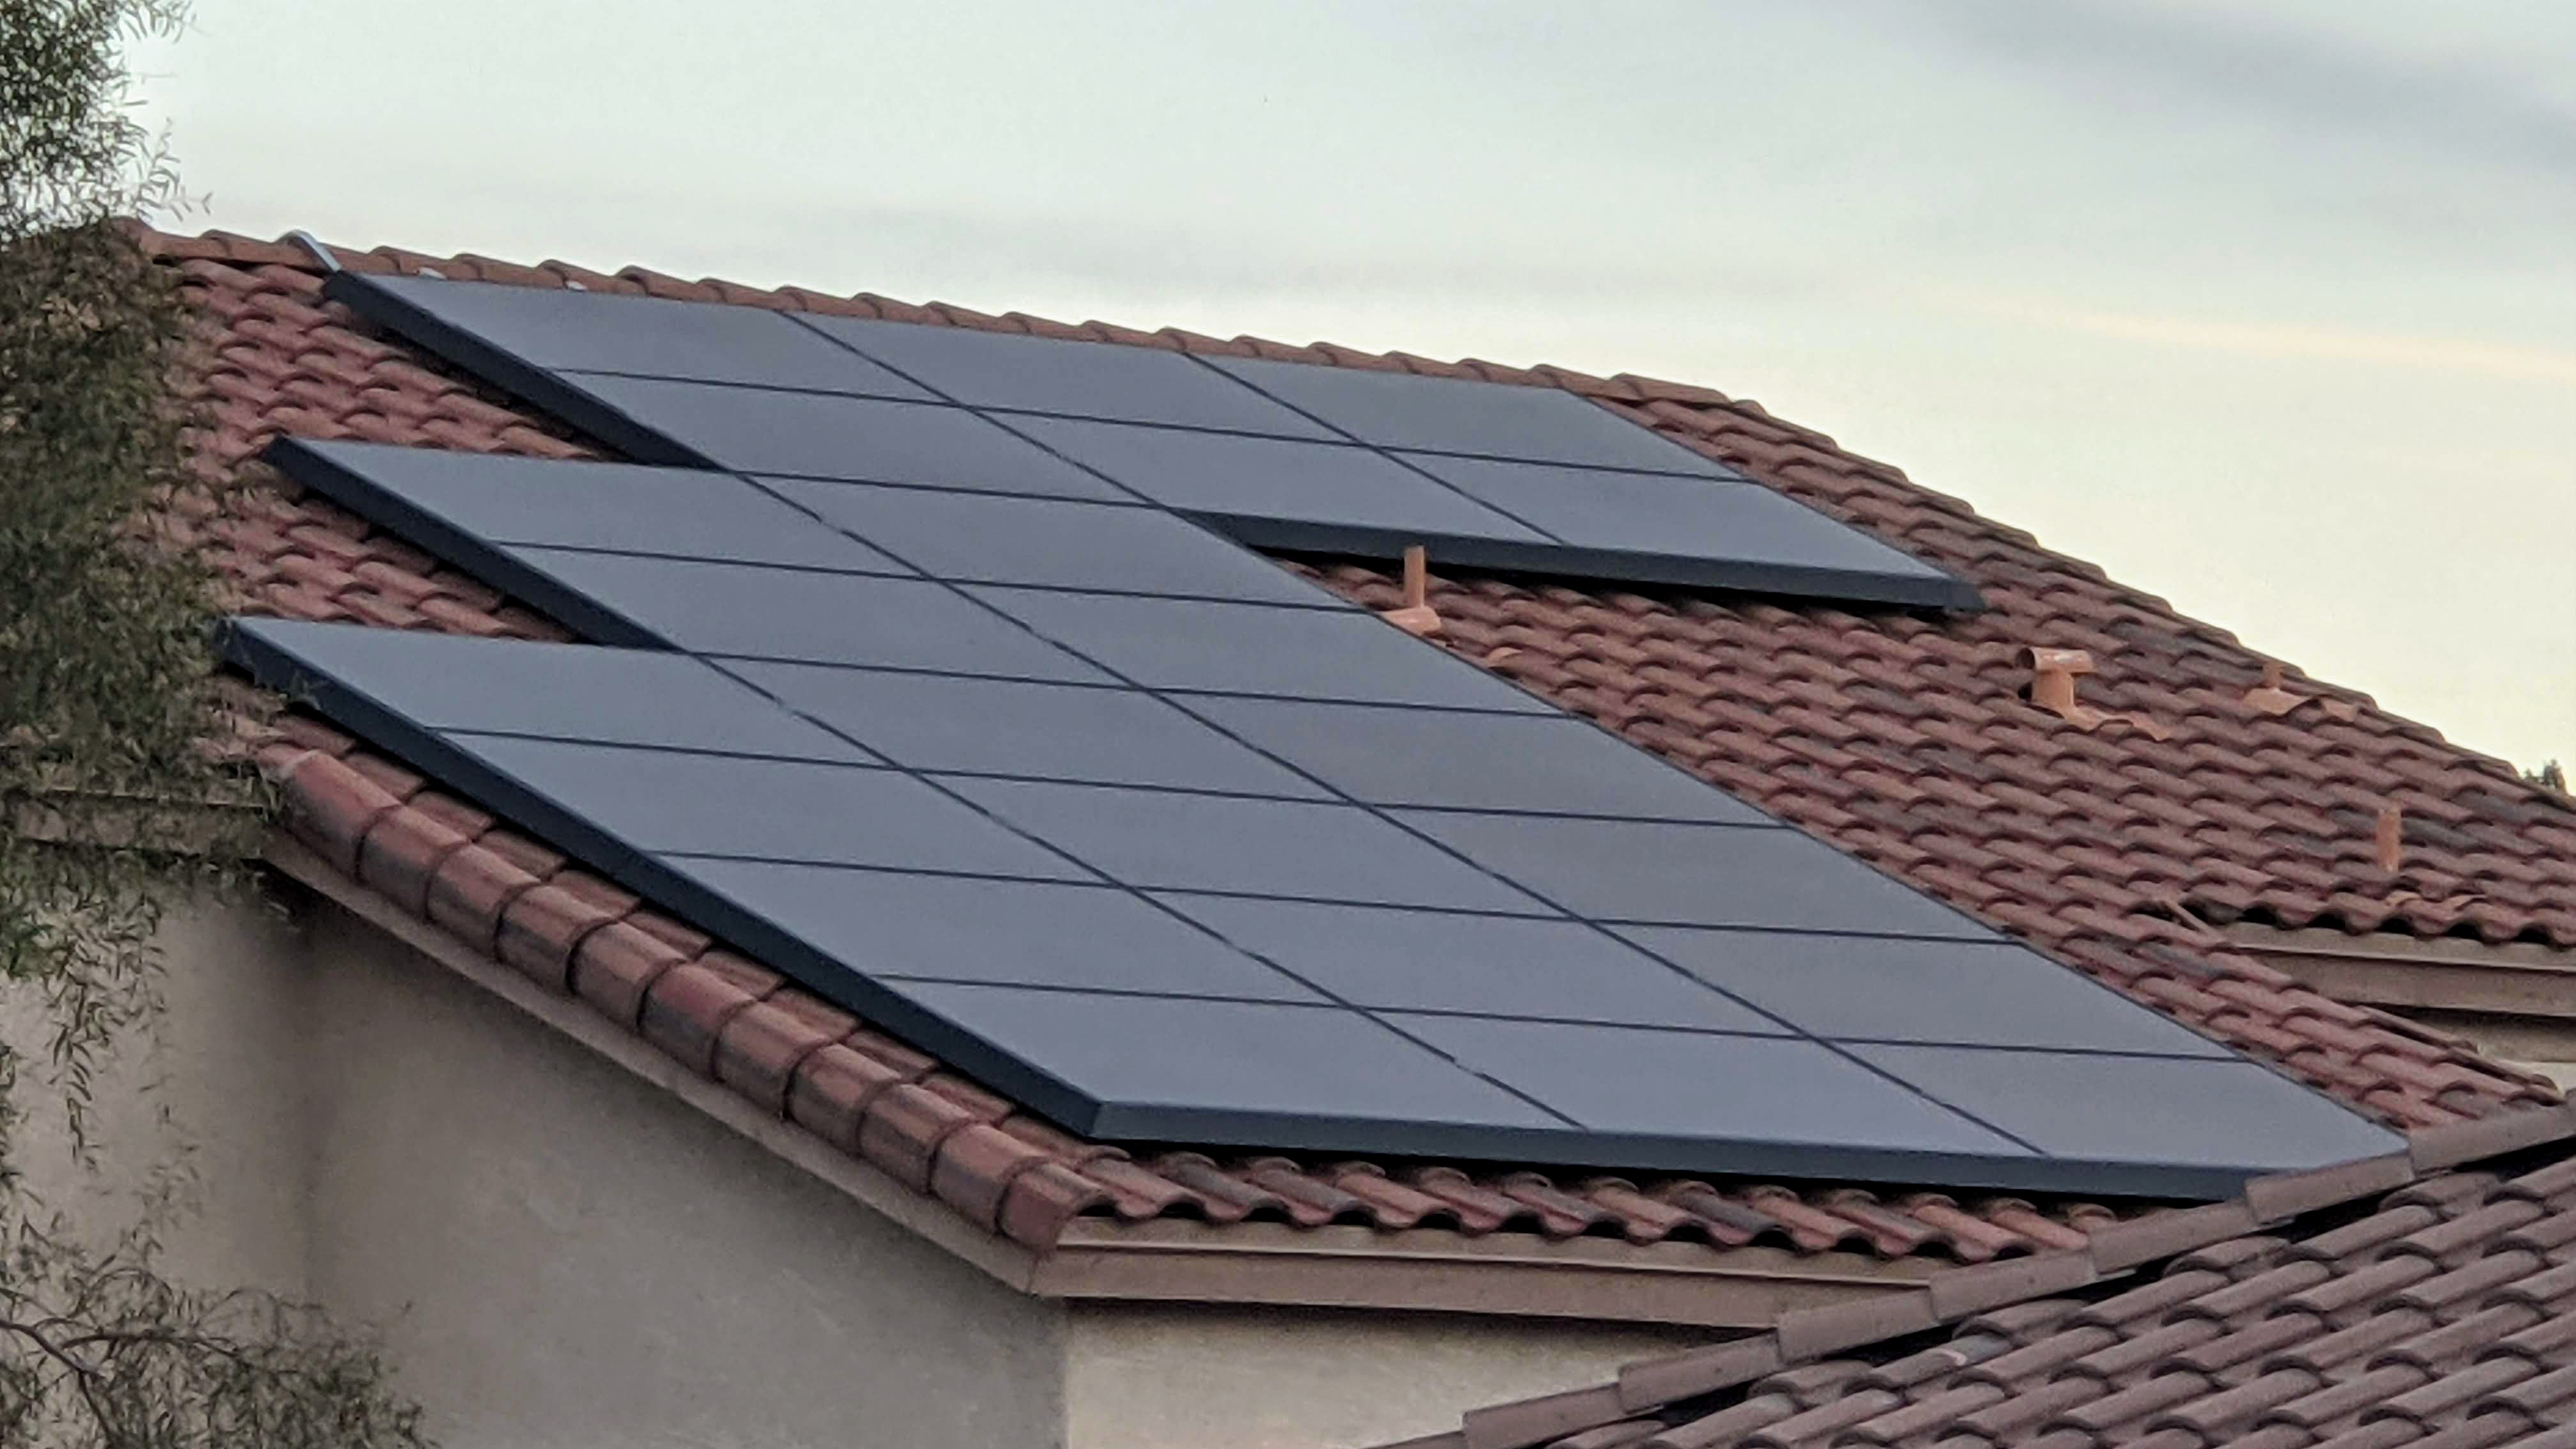
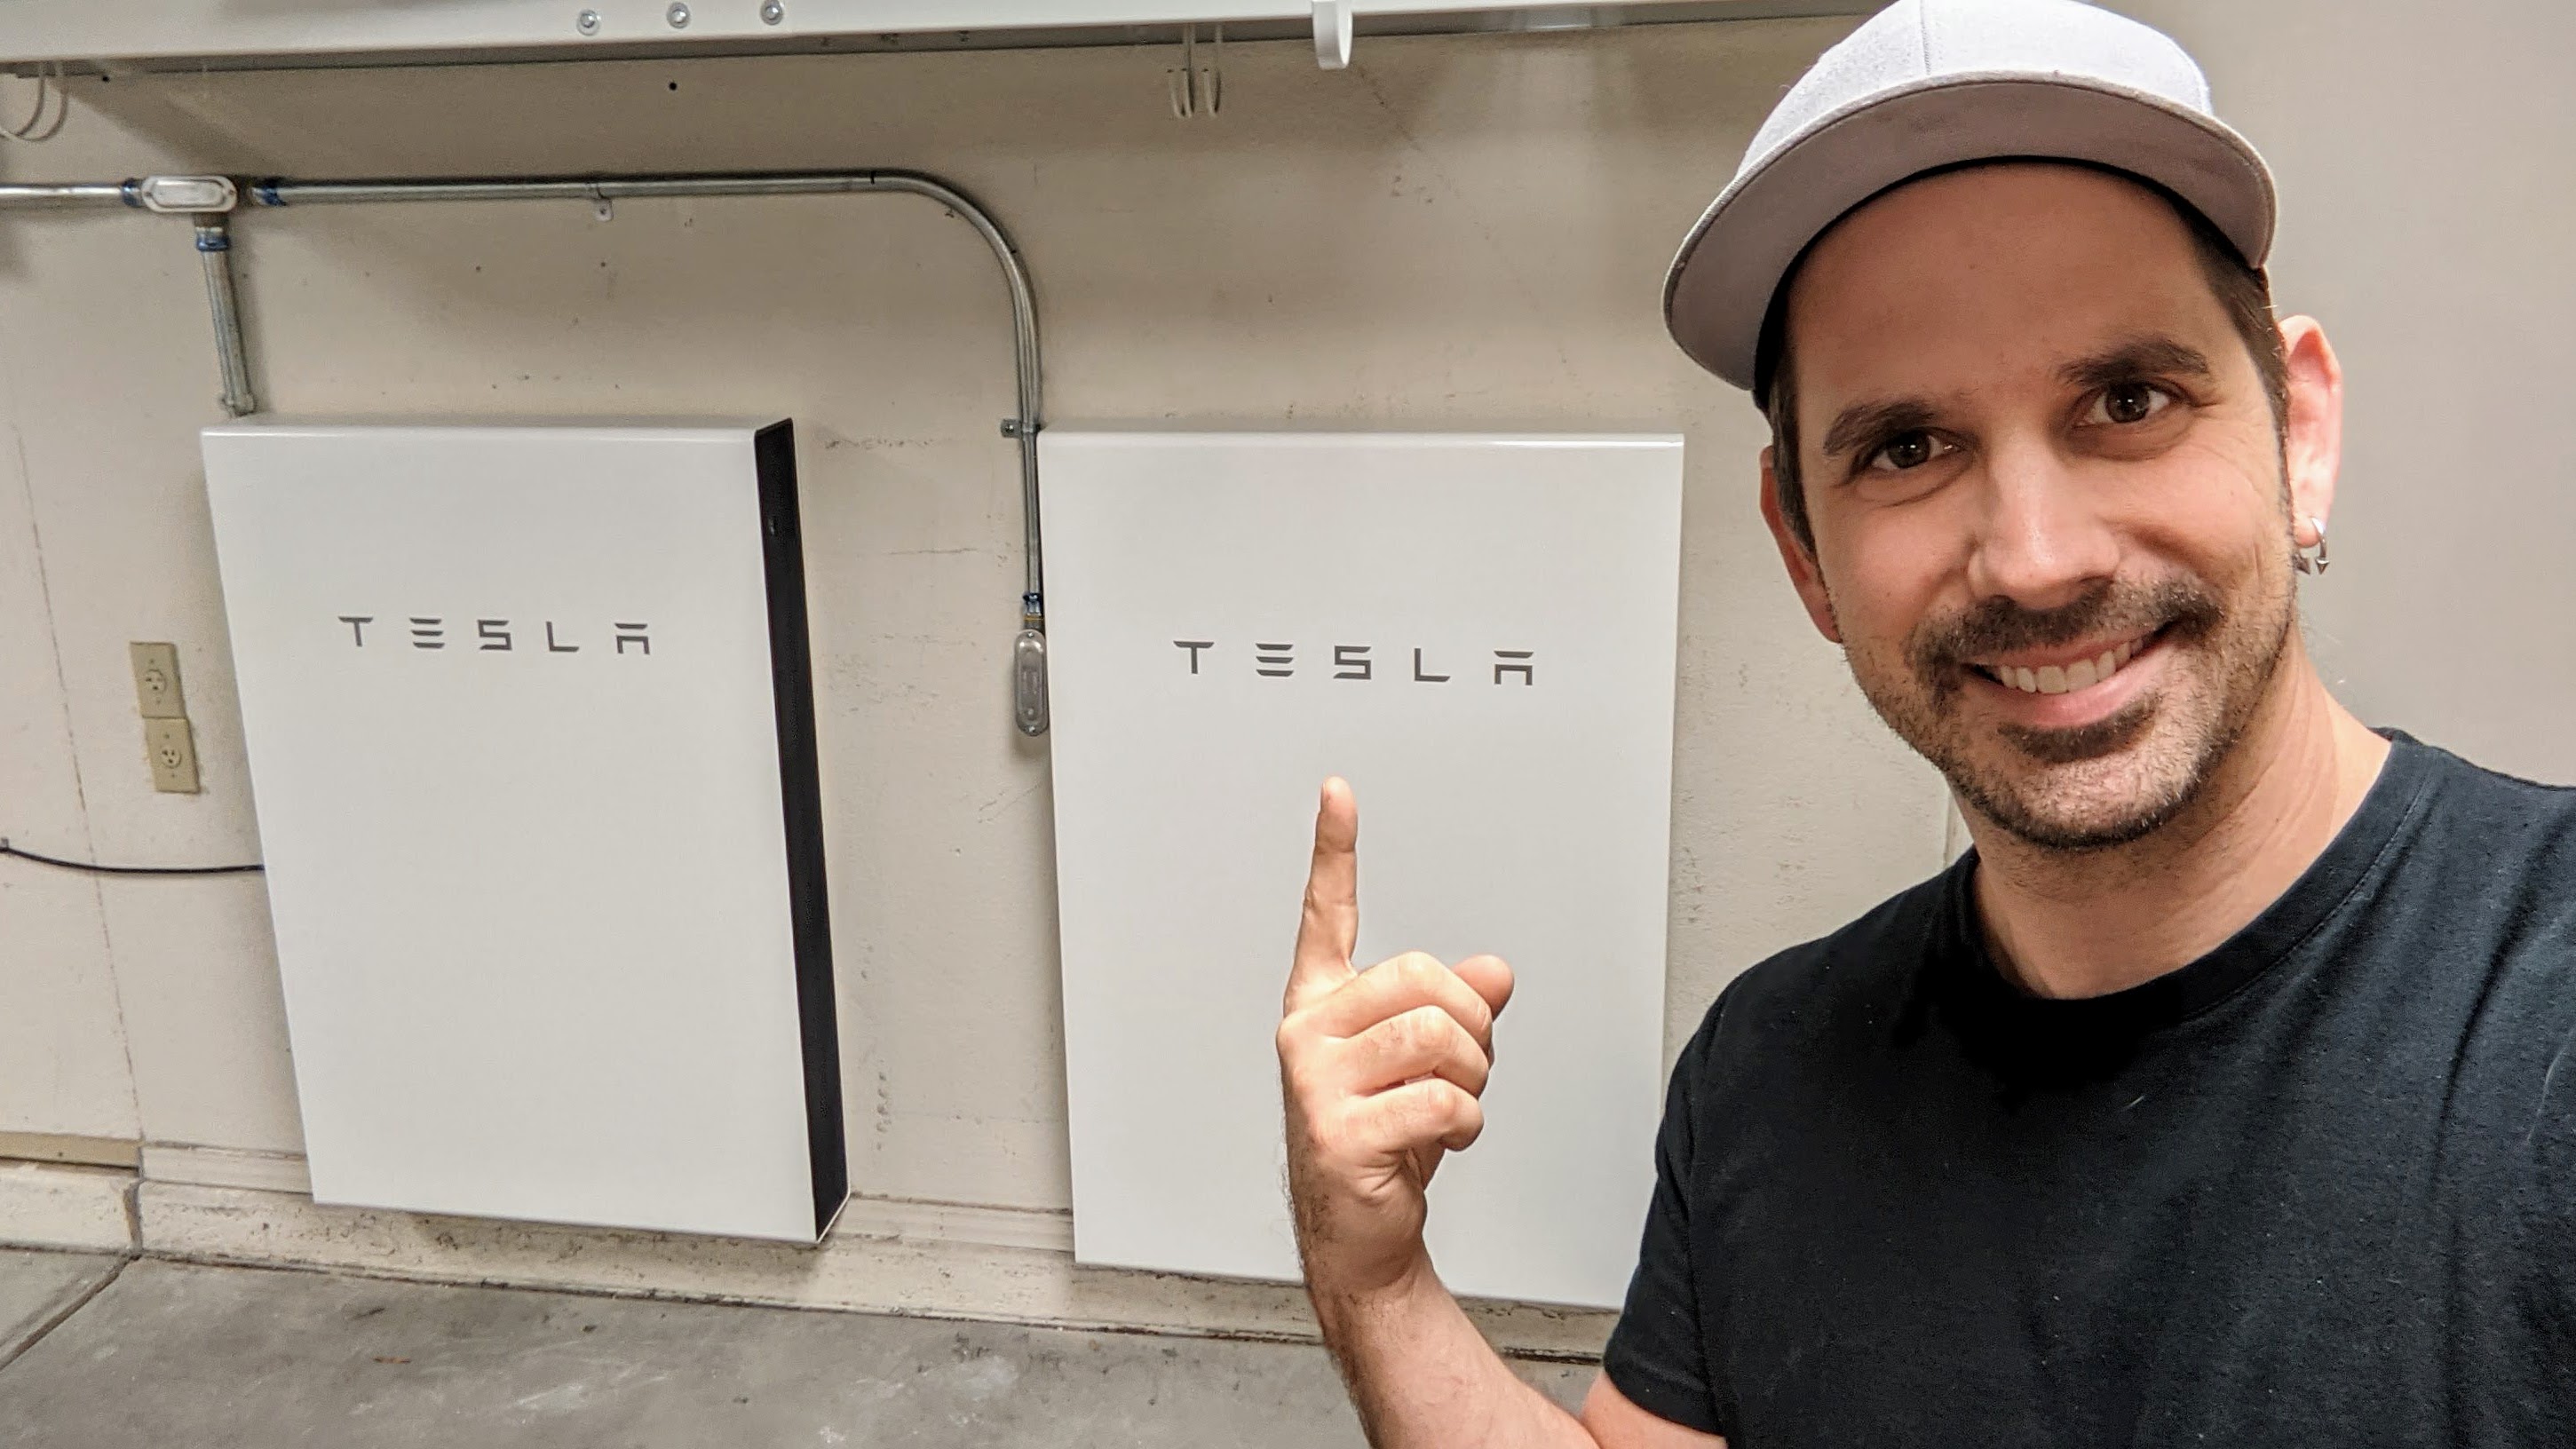
Contrast that to the option we selected with Tesla. The overall package includes a SolarEdge Inverter, Q.PEAK DUO panels, SolarEdge Power Optimizers, and Powerwall batteries. We opted to go with Tesla’s 12.24 kW system (36 panels) with 2 Powerwall batteries. Using the cash payment option and getting the tax credits brings the net cost down to just about $27K. Estimated finance charges by rolling it into the mortgage is about $12k for a total cost of about $39k. Over the course of 20 years, that comes out to about $160/month, at least $75/month cheaper than my current average electric bill. That savings will only grow over time!
Installation
The installation spanned three different days, thanks to inclement weather that weren’t the most favorable to working on a roof or with electricity (wind, rain and hail). The first day most of the panels were installed; the team was shorted on some Power Optimizers, so they couldn’t finish installing all the panels. The second day the panel crew was able to finish installing all the panels. The third day the Powerwall crew and solar crew were both on site to finish the installation. The Powerwall crew was done in about 4 hours, with only 2 hours of power outage time. Everyone was done by noon on each day.
A side note on the Solar and Powerwall teams - these guys were fantastic. They were helpful in answering questions I had about their processes, polite in their interactions, considerate of our house/property, explained things very well and overall I felt they did an outstanding job! In talking with a few of them, some of them came from the Solar City merger, others have been installing Solar for quite some time, and they were all very knowledgeable about what they were doing. It gave me great confidence that everything was being done correctly and that I would end up with a well functioning system. I felt bad that they had to work in the cold/rain the first two days and supplied them with a portable gas heater in my garage for them to stay warm and made sure to give them my appreciation for their work ethic and determination to complete the installation.
PTO and Configuration
The city came out and inspected the work within a week of the installation being complete. APS came the following week. They were unable to grant PTO due to some deficiencies in labeling of the equipment. They sent word back to Tesla to correct. About two weeks later, someone from Tesla arrived to correct the labeling. To my surprise the next day APS knocked on my door letting me know they were able to grant PTO and were ready to install the meters. She was pretty quick and I had to lose power in the house for about 30 seconds while she installed a new main meter and then I was ready to power on the system.
This is explained in Tesla’s power on instructions, but for the sake of completeness, the proper order to power up the system is in reverse from the TEG to the devices supplying power. More concretely, flip the breakers in the TEG, then the Solar disconnect, then the inverter, then the ESS disconnects, then the ESS breaker, then finally turn on the Powerwall batteries. It took about 5 minutes for the inverter to get into operation and for the TEG to start charging the batteries.
Once everything was up and running, and I could see power flowing in the Tesla app, I set to configuring the Powerwalls. I’ve settled on using the “Self-Powered” mode for now due to the size of the system, the two batteries and the great weather we’re currently having that doesn’t require the use of my heat or A/C. Once we start using the A/C when it warms up, I’ll start playing with the “Time-Based Control” which allows the Powerwalls to use energy forecasting to ensure the batteries are used during on-peak (higher electricity cost) periods, while drawing from the grid as needed in lower cost periods.
I’m currently on APS’s Saver Choice Max rate plan; this plan has a low per-kWh charge, but higher demand charges. We’ve been good about managing our electricity usage during on-peak, but the Powerwalls give us some additional flexibility as well. Never would I shower or do dishes or laundry during an on-peak period before this, but now I can do that without worrying about a demand charge from APS. Because the off-peak per-kWh charge is less than the APS solar export rate (Tranche 2019 & 2020), I expect to have a net-positive credit during months like this; we’ll see how that shapes up during the summer or winter months when the A/C or heat is going.
A note on APS plans - You usually do not want to be on a demand-based plan when you have solar only; when the sun goes down before on-peak is over, you’ll pull from the grid and incur demand charges which could end up costing you more or eating away at solar savings. APS and Tesla recommend that you use the standard Saver Choice (non-demand-based) plan so you have a constant fixed rate during off/on peak and no demand charges. With the Powerwall batteries, I can afford to stay on the demand-based plans because the batteries will prevent me from using the grid during on-peak times, thus no demand charge. Everyone’s situation is different however and you should do your own research to determine which rate plan is ideal for you in your situation.
Energy Observations
It’s interesting to look at the power usage graph in the Tesla app. I can tell when the pool is running, or when the water heater kicked on. After a shower, the water heater will draw a good 4-ish kw for almost 45 minutes. Aside from A/C in AZ, a water heater is probably the next highest electricity consumer in the house. You can see the three sharp spikes in the image below, all of those are from the water heater. The chunk mid-day is the pool. The increase near the end of the on-peak period is starting to use some appliances for preparing dinner.

As my water heater is nearing the end of its life (12 years old), I’ve decided to replace it with a new Rheem Hybrid Water Heater that uses a heat pump to heat the water, using only 25% of the energy that a conventional water heater uses with features like a heat pump, scheduling and more. This should help significantly trim our annual electricity usage and give us even more freedom in using hot water. Stay tuned for that one!
Tesla Experience
The entire process took almost 6 months from signing up online to Permission to Operate (PTO) (as you can see in the detailed breakdown below). Overall, getting solar + storage through Tesla was worth it and I’d do it again. The process was easy, the employees were friendly, the materials seem like good quality, the software and interface is as you would expect from Tesla, and the installation was painless (weather aside).
I had two project advisors throughout the process. The first was pretty good with prompt communication; sadly she moved to a different role in Tesla. The second advisor I was assigned wasn’t as quick with responses either via text or e-mail. The solar installation crew was fantastic, and you could tell they took pride in their work just by talking with them. The Powerwall installation crew was lightning fast (your mileage may vary, they had an extra guy on hand when they did mine) and likewise, just by talking with them you could get a sense that they enjoyed their job. Most of the people I talked with seemed to have a long tenure with Tesla or SolarCity prior to the Tesla buy-out.
I wanted to pay for the system with some credit cards, but unfortunately Tesla no longer allows that over the phone through their finance department. You have to pay online via a bank account, and it appears as they do a reverse-wire transfer from your bank account. Of course this only applies when you’re paying cash for the system. Your payment options may vary depending on if you’re taking a loan or subscribing.
If you’d like to read through a detailed breakdown of the timeline and when things occurred, please keep on reading. Highlights are below with details after that. If this writeup has helped sway you into getting solar through Tesla, please consider using my referral link for your purchase. You’ll get $100 back after activation of your system.
Process Highlights
- Thursday, September 3rd, 2020 - Order Placed
- Friday, September 4th, 2020 - Project Advisor Intro and Initial Design
- Tuesday, September 29th, 2020 - Revised Design Complete
- Thursday, October 1st, 2020 - HOA Approval
- Tuesday, October 20th, 2020 - Electrical Plans Completed
- Tuesday, October 27th, 2020 - Power Company Approval and Permit Requested
- Monday, November 9th, 2020 - New Project Advisor Assigned
- Monday, December 7th, 2020 - City Permits Issued, Installation Scheduled
- Saturday, January 23rd, 2021 - INSTALLATION BEGINS!!!
- Monday, January 25th, 2021 - Installation Day 2
- Saturday, January 30th, 2021 - Installation Day 3
- Thursday, February 4, 2021 - City Inspection Complete, Invoice Received
- Wednesday, February 10, 2021 - Utility Inspection - First Attempt
- Friday, February 26, 2021 - Utility Inspection Part 2 And PTO!
Thursday, September 3rd, 2020 - Order Placed
It was easy to get started with Tesla. All you have to do is visit their website (referral link; you’ll get $100 back after system activation), fill out your address and average monthly electric bill and then you can configure your system and payment options. Tesla selects the system they think is most optimal based on your electric bill. In my case it was the 12.24 kW system. I added the Powerwall option as well. It defaulted to three; I decreased it to two. Of course the system size Tesla selects for you is an estimate. Since you don’t have that door-to-door salesman coming up and explaining everything, you’ll need to do some research and determine what system size will end up working best for your needs and be most cost effective for you.
I entered my contact information and credit card info ($100 non-refundable deposit) and placed my order.
After submitting the application, I was immediately able to start the virtual home assessment via Tesla’s website. I was asked about various features of my home and then prompted on subsequent screens to upload pictures of things like my roof, electrical panel, garage and A/C system.
Friday, September 4th, 2020 - Project Advisor Intro and Initial Design
I received an email and text from Ariana with Tesla Solar introducing herself and advising me that the design of my system was underway. She was able to quickly answer a few questions that I had around HOA approvals and timelines and then I was all set to wait for the design.
Later on in the evening, I received the initial design. The design document sent over included specs on the SolarEdge Inverter, Q.PEAK DUO panels and Powerwalls. In reviewing the initial design document, there was a note that the layout of the system did not match the order (layout was 11.9 kW, or 35 panels instead of the full 36) due to utility prohibitions.
I did some digging into APS’s rules around solar and found that there are two restrictions in play for my property: I have a 200 amp main breaker so I’m capped at a 15 kW system; and since I’m looking at a system greater than 10 kW, I’m capped at 1.5x my highest 1 hour demand in the last 12 months. Up until my latest bill, my largest billed demand was 8 kW, therefore capping me at a 12 kW system.
Fortunately, my latest bill that was about to be sent out had a demand of 8.36 kW, capping me at 12.54 kW system, thus allowing me to go with the full 36 panels. A few days later my billing cycle was up and I sent the newest bill with demand to Ariana so they could redesign with the full 36 panels.
Tuesday, September 29th, 2020 - Revised Design Complete
Got an email from Ariana and a notice from Tesla that new documents were available for me to review; including the revised design with all 36 panels, some APS documents to sign and a few other things. I signed all of the documents and then downloaded a copy of the design to submit to my HOA’s architectural committee.
The design ended up with 14 panels (4.76 kW) on the east face of the roof and 22 panels (7.48 kW) on the west. PVWatts estimates this will output 7700 kWh/year and 12073 kWh/year, respectively, for a total of 19773 kWh/year. Not far off from the first year estimate from Tesla of 18910 kWh.
Thursday, October 1st, 2020 - HOA Approval
I received approval from the HOA for the Solar project.
Tuesday, October 20th, 2020 - Electrical Plans Completed
Tesla completed the electrical plans and determined they would be able to accommodate whole-home backup with the two Powerwall batteries based on the loads in my electrical panel! I was sent the plans to review (which is awesome, because I like learning how this stuff works) and I received an email from APS seeking authorization for Tesla to submit applications on my behalf. I signed the paperwork (Docusign) and let my rep know they were good to move forward on their end.
Two days later, I received a notice from APS that an interconnection application had been submitted.
In reviewing the design document, I was pleasantly surprised to see that Tesla was including SolarEdge Power Optimizers in the design as well. These weren’t on the initial plans but I’m happy to see them included here.
Tuesday, October 27th, 2020 - Power Company Approval and Permit Requested
After a few days of back and forth between Tesla and APS, APS has approved the installation plans and a City permit request has been submitted.
Monday, November 9th, 2020 - New Project Advisor Assigned
I’ve been assigned a new Project Advisor, Alessandra, as Ariana has moved to a new role in Tesla Auto. Ariana also let me know they’re expecting city permits to be issued sometime around Thanksgiving week.
Monday, December 7th, 2020 - City Permits Issued, Installation Scheduled
Permits were issued by the city and installation has been scheduled for January 25th. I’m now following up with Tesla on what happens with the 4% decrease in the Federal ITC. In early November, there was a notice on Tesla’s site indicating that Tesla would provide a rebate of 4% to cover the decrease if they couldn’t schedule installation prior to the end of the year provided all documents were in prior to December 1st.
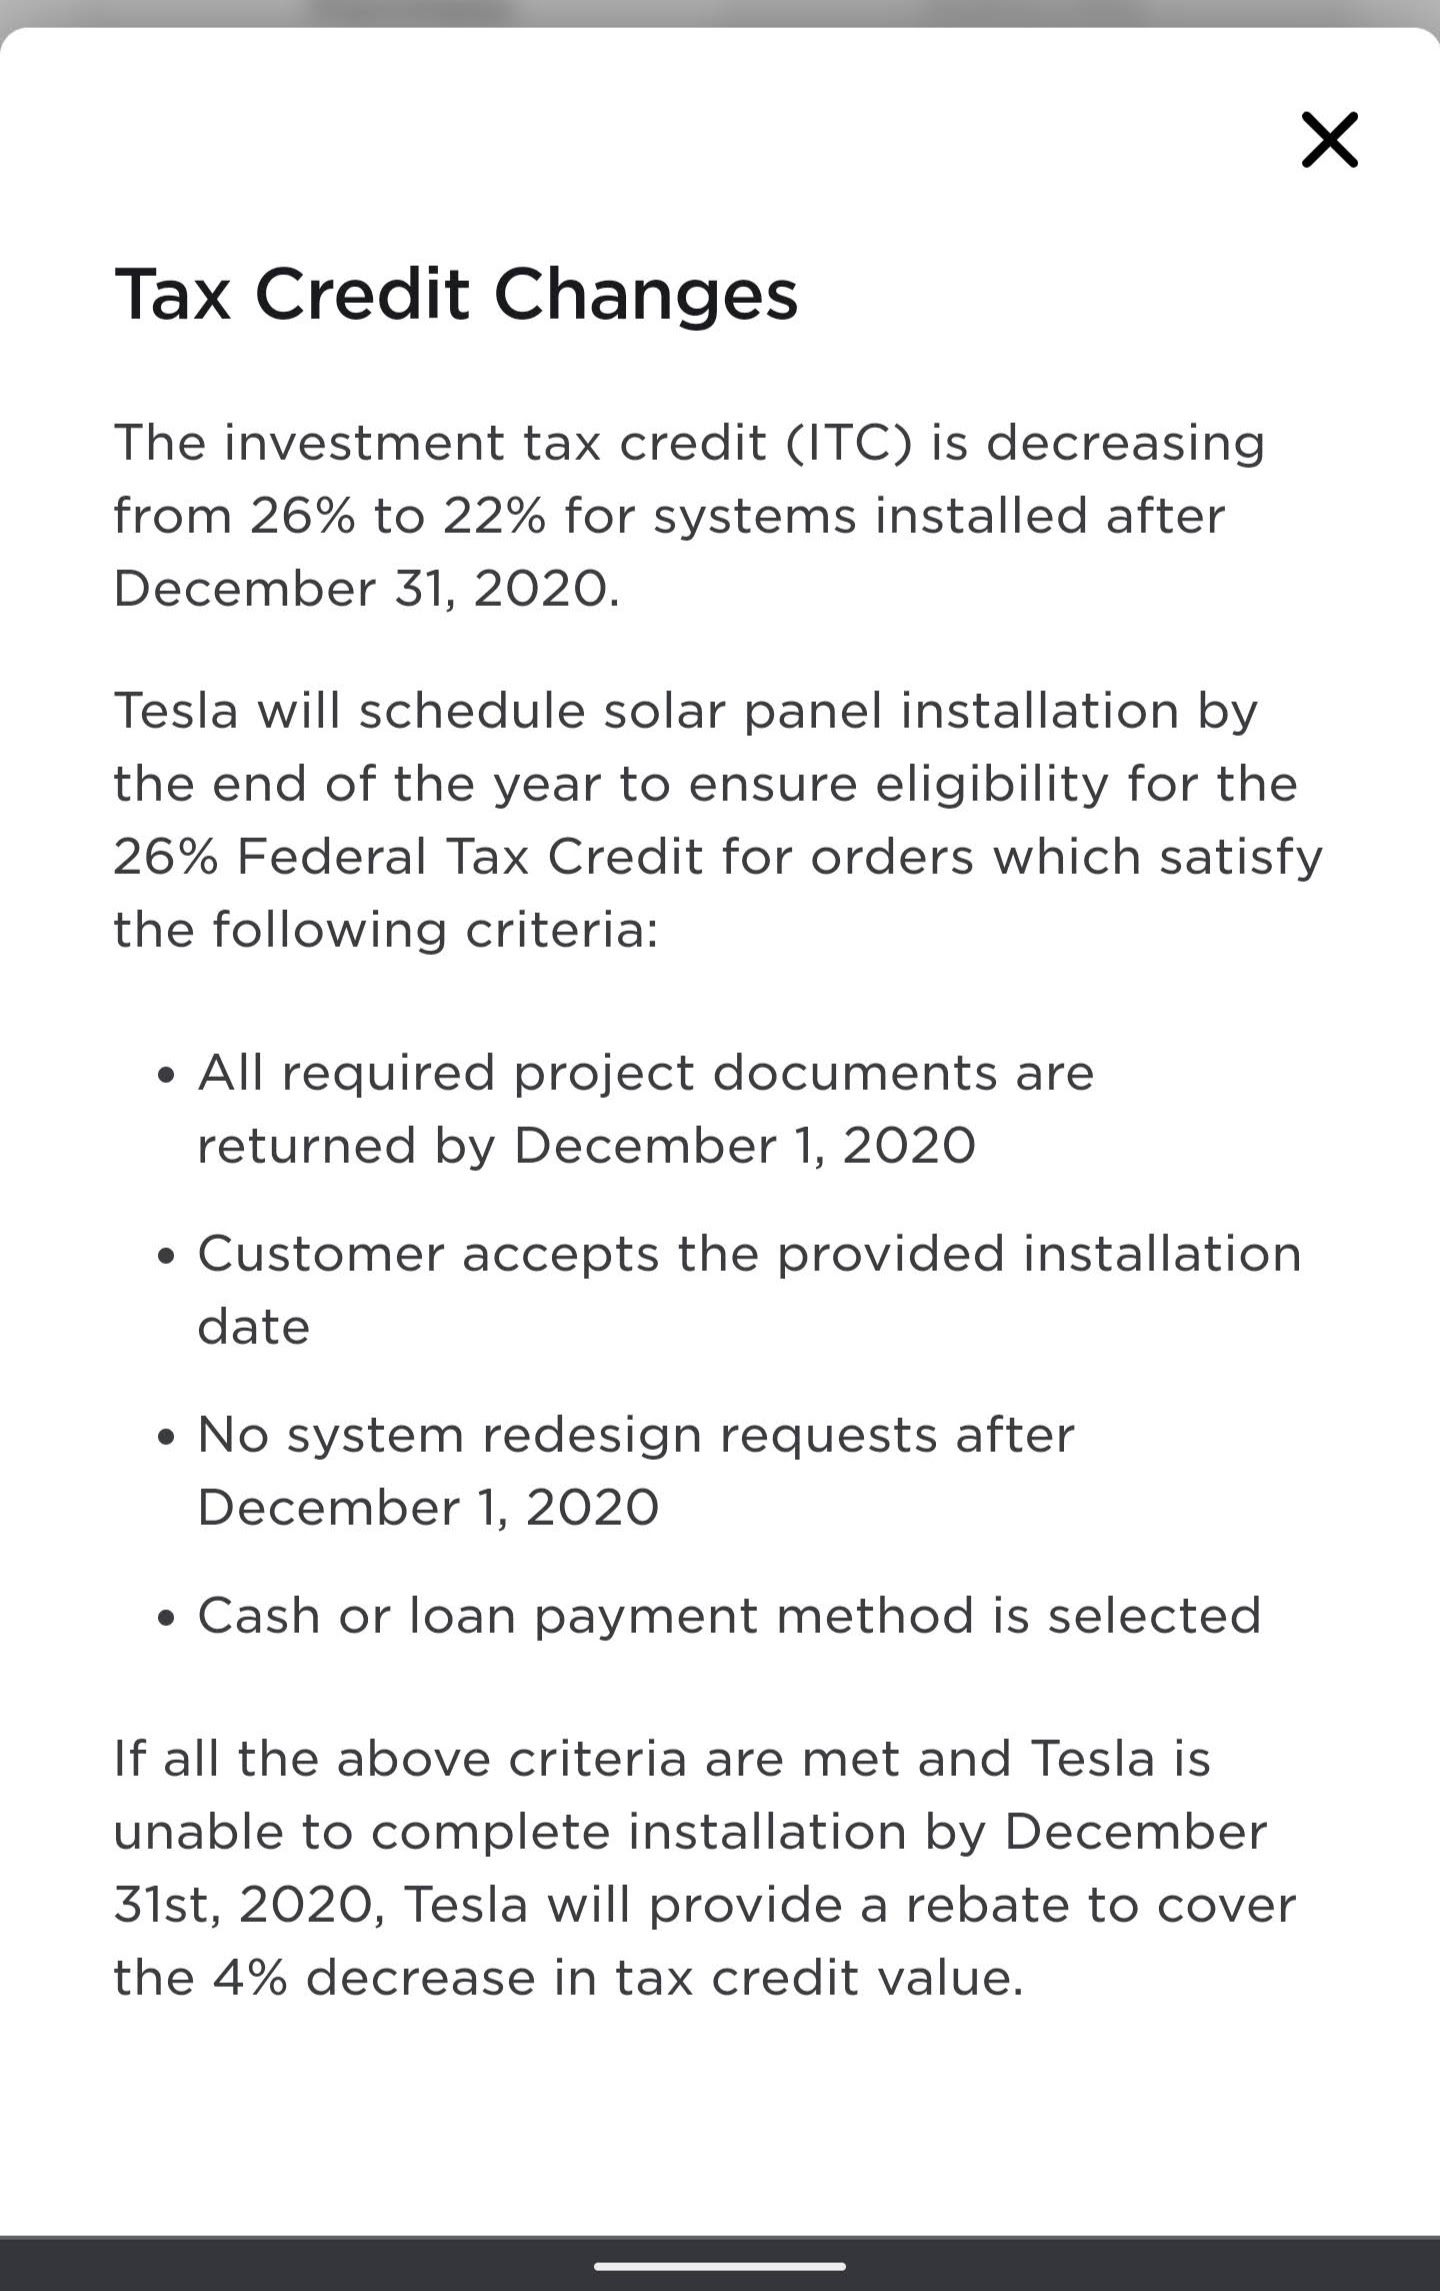
Sunday, December 27th, 2020 - Consolidated Appropriations Act Signed by President Trump, Tax Credit Extended
The above issue regarding the tax credit is now moot. Included in the Consolidated Appropriations Act, 2021 passed by Congress and signed into law by President Trump today is a provision to extend the Solar Investment Tax Credit at 26% through December 31, 2022. Now we simply await the installation!
Saturday, January 23rd, 2021 - INSTALLATION BEGINS!!!
I got a call from Tesla Solar Scheduling yesterday, and they asked if they could start the installation today and finish on Monday. The weather isn’t looking so good for Monday but there was a bit of a reprieve today, so they wanted to get the panels up on the roof. The installation team arrived bright and early at 7:15a to begin their work. They were pretty quick and got 26 of the 36 panels racked up on the roof. The other 10 (not enough power optimizers on hand), the electrical and the Powerwalls will wait until Monday morning.
Monday, January 25th, 2021 - Installation Day 2
Day 2 of the installation. It was pretty wet outside and there was only a short 2-3 hours when rain wasn’t expected, so the Powerwall crew was called off for the day. The Solar crew was able to finish a majority of their work except for testing and painting the conduit on the roof.
Saturday, January 30th, 2021 - Installation Day 3
Day 3 of installation. No rain, a mostly cloud-less day, and perfect for finishing the installation of the system.
The Powerwall crew arrived right on time at 7a and got to work. They cut power to the house at 7:50 which gave me time to shut down computers and network equipment. To my surprise, these guys moved quick; power was restored by 10am! They continued their work for about another two hours, completing the wiring of the Powerwall batteries and getting the Tesla Energy Gateway (TEG) wired up. They completed their work shortly before noon and with some capacity in each battery already, did a test of killing grid power and letting the batteries take over. As expected, the lights flickered briefly as the Powerwall batteries took over. My face lit up!
Just as the Powerwall crew was finishing up, the Solar crew returned to complete their work; painting conduit, connecting solar to the TEG and then performing their test to ensure all panels were recognized by the inverter and that power was flowing to the house and grid.
Thursday, February 4, 2021 - City Inspection Complete, Invoice Received
Tesla texted yesterday to schedule the city inspection and as luck would have it, there was an opening for today. The inspector arrived at 9:30 and green-tagged the installation! Now to wait for the APS inspection and Permission To Operate (PTO).
I’ve also received and paid the $38,000 invoice. Unfortunately Tesla no longer accepts credit cards over the phone, you can only link a bank account online to pay (damn, no Credit Card points/rewards).
Wednesday, February 10, 2021 - Utility Inspection - First Attempt
APS paid a visit today to inspect and hopefully provide PTO. Unfortunately, it was a no-go. The disconnects on either side of the bi-directional meter for the batteries were not labeled 1/2 and 2/2 per the design plans, so they were unable to approve. They’ve sent information back to Tesla for remediation.
Friday, February 26, 2021 - Utility Inspection Part 2 And PTO!
Yesterday, someone from Tesla came out and made the requested additions to the disconnects and this morning just before noon, an APS worker was here to place the new meters and replace the primary grid meter. After they left, I flipped all the breakers, disconnects and power switches (on the Powerwalls) on and watched it all come up in the Tesla app!