
If you’re a larger organization running Microsoft 365 with Exchange Online, you probably have a need for applications, multifunction devices like printers or other devices that need to connect to an SMTP server to send email to your organization or others outside your organization. Using an SMTP relay, Microsoft 365 can relay emails on your behalf by using a connector that’s configured with your public IP address or a TLS certificate.
This article will discuss configuring Postfix on Ubuntu 18.04 as an internal Smarthost to relay mail to your Microsoft 365 tenant. We’ll leverage Fuglu as an advanced content filter and Certbot for security. I’ll also share a small trick I found to ensure that Microsoft 365 sees all of your Postfix emails as internal emails, rather than anonymous/external.
For the remainder of this post, I’ll assume that you’re creating a dedicated Postfix SMTP relay and all commands are run as root unless otherwise specified.
In This Post
- Server Specs
- Fuglu
- Certbot
- Postfix
- Connecting to Microsoft 365
- Testing the complete process
- Wrapping up
Server Specs
The relay at my company passes close to 1 million emails/year to Microsoft 365, totalling almost 250 GB in size. That breaks down to roughly 5 emails/minute during operating hours. It handles emails from internal applications (web and desktop), voicemail email notifications (with transcribing via Google’s Speech to Text api), scan-to-email MFPs, network monitoring applications and other devices that send email within the organization. What once started as a short term solution to allowing a few MFPs to scan-to-email over 10 years ago has turned into a critical part of our infrastructure.
We run two SMTP relays that both connect to Microsoft 365 (with the same connector); one at each of our datacenters. They have the following specs:
- 2 vCPUs
- 4 GB RAM
- 40 GB Primary HDD (for OS)
- 100 GB Secondary HDD (for archiving)
Fuglu
First we’re going to install Fuglu. Fuglu is an advanced content scanner that can do all sorts of things such as archiving email, DKIM signing, spam / antivirus scanning and more! You can even write your own Python plugins to create your own scanner/filter (we’ve leveraged this to send voicemails through Google’s Speech-to-text engine to transcribe them).
Installation
There are many ways to install Fuglu; since this is a single purpose machine, I’ve installed Fuglu as a deb package that I created using their Gitlab repo. There is already a script in their repo to assist with this, but I made some changes to it to work properly on Python 3. You can run these steps on the machine itself, or you can leverage Docker to create the deb file in an isolated environment. I opted for the latter route. I have Docker installed on my laptop, so I created the deb there and then moved it to the server to install.
Dockerfile
FROM python:3.6
MAINTAINER no-email@gmail.com

VOLUME /build
WORKDIR /tmp

COPY build.sh /build.sh
RUN chmod +x /build.sh

ENTRYPOINT /build.sh
build.sh
#!/bin/bash

# Needed because Makefile loads some stuff from here
apt update

# Clone down fuglu
git clone https://gitlab.com/fumail/fuglu.git
cd fuglu/fpm || exit

# Edit the Makefile to work for Python3 on Ubuntu Bionic
sed -i 's/sudo //g' Makefile
sed -i 's~deb-init.*~deb-systemd ../fuglu/scripts/startscripts/debian/8/fuglu.service \\~g' Makefile
sed -i 's/depends spamassassin/deb-suggests spamassassin/g' Makefile
sed -i 's/python-beautifulsoup/python3-bs4/g' Makefile
sed -i 's/python-magic/python3-magic/g' Makefile
sed -i 's~\$(PACKAGE)~--python-disable-dependency packaging --depends python3-packaging --python-scripts-executable "/usr/bin/env python3" --python-install-lib /usr/local/lib/python3.6/dist-packages $(PACKAGE)~g' Makefile

# Make it into a deb
make deb

# Copy it to the build dir (this should be mounted from the host)
mv python-fuglu_* /build/.
Then run as so (this will leave the created deb file in your /tmp directory):
docker build --rm -t fuglu-builder:latest .
pushd /tmp
docker run --rm -v `pwd`:/build fuglu-builder
popd
Once the deb is created and copied to your server, install it:
$ apt install /absolute/path/to/deb
Configuration
Now that Fuglu is installed, it’s time to get it configured. First we’ll create some directories that we’ll need:
$ install -o fuglu -g fuglu -m 0770 -d /var/lib/fuglu/archive
$ install -o fuglu -g fuglu -m 0775 -d /var/lib/fuglu/plugins
$ install -o fuglu -g fuglu -m 0775 -d /var/lib/fuglu/tmp
$ install -o fuglu -g fuglu -m 0700 -d /etc/fuglu/dkim
$ mkdir /etc/fuglu/conf.d
If you’ll be using a secondary drive for the archive, now would be the time to format it, add it to /etc/fstab and mount it (adjust based on your device path):
$ DEVICE=/dev/sdb
$ mkfs.ext4 $DEVICE
$ UUID=$(blkid | grep -oP "(?<=$DEVICE: UUID=\")[^\"]+")
$ echo "UUID=$UUID /var/lib/fuglu/archive ext4 defaults 0 1" >> /etc/fstab
$ mount -a
$ chown fuglu.fuglu /var/lib/fuglu/archive
$ chmod 0770 /var/lib/fuglu/archive
Next we’ll tweak the configuration of Fuglu to get it running how we want it. First we’ll archive all mail:
$ grep -oq envelope_from /etc/fuglu/archive.regex || echo 'envelope_from .*' >> /etc/fuglu/archive.regex
Then we’ll override the main configuration, namely the plugins we want to use and some directories. The plugins used are:
/etc/fuglu/conf.d/main.conf
[main]
# These are run in order, dkimsign always needs to be last
plugins=archive,attachment,clamav,dkimsign
plugindir=/var/lib/fuglu/plugins
tempdir=/var/lib/fuglu/tmp
With the plugins enabled and directories set, lets configure some plugins. Of the four above, two need some configuration; the archive plugin and the DKIM signing plugin.
/etc/fuglu/conf.d/archive.conf
[ArchivePlugin]
archivedir=/var/lib/fuglu/archive
subdirtemplate=${date}
If you wish to retain only X days of archives, you’ll need to create a small cron script to handle clearing out older emails. Create the following file, adjust the 90 to whatever works for you and the space you have available and make it executable.
/etc/cron.daily/clear-archived-mail
#!/bin/sh

# Delete all mail files in /var/lib/fuglu/archive created more than 90 days ago
find /var/lib/fuglu/archive -type f -ctime +90 -delete
/etc/fuglu/conf.d/dkimsign.conf
[DKIMSignPlugin]
#Location of the private key file. supports standard template variables plus additional ${header_from_domain} which extracts the domain name from the From: -Header
privatekeyfile=/etc/fuglu/dkim/${header_from_domain}.key

#Type of header canonicalization (simple or relaxed)
canonicalizeheaders=relaxed

#Type of body canonicalization (simple or relaxed)
canonicalizebody=relaxed

#selector to use when signing, supports templates
selector=default

#comma separated list of headers to sign. empty string=sign all headers
signheaders=

#include l= tag in dkim header
signbodylength=False
Now create the DKIM key and get it added to DNS (replace yourdomain.com with your domain):
# Generate the key
$ sudo -u fuglu openssl genrsa -out "/etc/fuglu/dkim/yourdomain.com.key" 2048
# Echo out it in a format for DNS
$ echo -n "postfix._domainkey TXT  \"v=DKIM1; k=rsa; p=" ; openssl rsa -in "/etc/fuglu/dkim/yourdomain.com.key" -pubout -outform PEM 2>/dev/null | grep -v 'PUBLIC KEY' | tr -d '\n' ; echo ";\""
Use the output of the echo statement above to create your DNS record. Every service provider is different, so I won’t begin to enumerate them here. Review the documentation of your DNS provider if you need assistance creating a TXT record. To verify the TXT record is created properly, you should be able to dig the domain key and verify the output:
$ dig postfix._domainkey.yourdomain.com TXT +short
"v=DKIM1; k=rsa; p=MIGfMA0GCSqGSIb3DQEBAQUAA4GNADCBiQKBgQDCNHiZueUC8uB02bP3Z5z0A9Lz4fMecxAlyfC9jJb969byds9+ePSJwYiCXcKGlX1aH4r8Baj9e6l0g2AM+OEMYXzJd93q6CGoKPxGBZQo8s2BKHWOfg7ifRYu/oiU3K29WxeuMBDUUyPQnjWZa2gwT9bBpZwts+2LWU8pCbZudwIDAQAB"
Finally, restart Fuglu!
$ systemctl restart fuglu
Certbot
If you’re not familiar with Certbot, it’s a fantastic tool to automate the process of installing Let’s Encrypt SSL certificates on your server. Installation and configuration is pretty straight forward. How you verify your domain is up to you. We use Route53 for our domains and therefore leverage the certbot-dns-route53 plugin. You won’t be able to use the HTTP verification if your server is not web accessible; DNS is really the best route.
Installation
Install Certbot via snap:
$ snap install --classic certbot
$ snap set certbot trust-plugin-with-root=ok
$ snap install certbot-dns-route53
$ ln -s /snap/bin/certbot /usr/bin/certbot
Configuration
Route53
We use Route53 for DNS, so I’ll at least explain the necessary setup for that. You’ll need to add an access/secret key for an IAM user that has permission to create DNS entries in the zone you’ll be creating certificates for. A simple IAM policy like this will work:
{
    "Version": "2012-10-17",
    "Statement": [
        {
            "Effect": "Allow",
            "Action": [
                "route53:GetChange",
                "route53:ListHostedZones"
            ],
            "Resource": "*"
        },
        {
            "Effect": "Allow",
            "Action": "route53:ChangeResourceRecordSets",
            "Resource": "arn:aws:route53:::hostedzone/<yourzone>"
        }
    ]
}
Next you’ll want to create a credential file that Certbot can use to perform DNS validation:
# Create the credential file
$ cat <<EOT > /etc/letsencrypt/aws.credentials
[default]
aws_access_key_id=<your-aws-access-key>
aws_secret_access_key=<your-aws-secret-key>
EOT
$ chmod 600 /etc/letsencrypt/aws.credentials

# Override the systemd service file
$ mkdir -p /etc/systemd/system/snap.certbot.renew.service.d
$ cat <<EOT > /etc/systemd/system/snap.certbot.renew.service.d/override.conf
[Service]
Environment="AWS_CONFIG_FILE=/etc/letsencrypt/aws.credentials"
EOT
$ systemctl daemon-reload
Generation
Let’s generate our cert now. If everything was installed and configured correctly, two commands will get you a cert. Note the deploy hook in the command that will force postfix to be reloaded whenever a new certificate is generated as well.
$ certbot register --no-eff-email --agree-tos -m <youremail@yourdomain.com>
$ sudo AWS_CONFIG_FILE=/etc/letsencrypt/aws.credentials certbot certonly --deploy-hook="systemctl reload postfix" --dns-route53 -d <yourdomain.com>
Postfix
Now that Fuglu and Certbot are both installed and configured, it’s time to install and configure Postfix.
Installation
$ DEBIAN_FRONTEND="noninteractive" apt install -y postfix postfix-pcre
Yes, it’s that simple! We use the DEBIAN_FRONTEND environment variable so that apt doesn’t prompt for configuration information during install. It’s not necessary as we’re going to override almost all of it in the configuration section below.
Configuration
First update the server’s mailname:
$ echo "yourdomain.com" > /etc/mailname
Then a DH params file for TLS Forward Secrecy:
$ openssl dhparam -out /etc/postfix/dh2048.pem 2048
Now a few files to help us configure things in Postfix:
/etc/postfix/esmtp_access
# Use this file to prevent keywords from being sent in response to EHLO commands.  We had two devices on our network that
# that would only try TLS1.0 negotiation for STARTTLS which is disabled, so we removed STARTTLS from their offering.
#10.1.1.1/32  starttls
/etc/postfix/filter
# filter for "trusted", add/remove regular expressions here to match your IP schemes
#/^10\./ FILTER fuglu:[127.0.0.1]:10099
#/^192\.168\./ FILTER fuglu:[127.0.0.1]:10099
#/^172\.16\./ FILTER fuglu:[127.0.0.1]:10099

# filter for others, used for emails from Microsoft 365, prevents DKIM Signing (see /etc/fuglu/skipplugins.regex)
/^\d+\.\d+\.\d+\.\d+$/ FILTER fuglu:[127.0.0.1]:10025
/etc/postfix/tls_policy
# Replace yourdomain-com with your Microsoft 365 domain
[yourdomain-com.mail.protection.outlook.com]:25 encrypt
* none
/etc/postfix/transport
# If your Postfix server relays emails to other destinations, you can add them here.
# sub.yourdomain.com :smtpserver.yourdomain.com
# Replace yourdomain-com with your Microsoft 365 domain.  Keep the brackets, they're important!
* :[yourdomain-com.mail.protection.outlook.com]:25
/etc/postfix/mynetworks
# Include all network masks allowed to send mail through Postfix
# 10.0.0.0/8 OK
# 192.168.0.0/16 OK
/etc/postfix/header_checks
# This is the secret ingredient that allows Exchange Online to believe these are internal emails (just like a real hybrid server!)
/^To:/i PREPEND X-MS-Exchange-CrossPremises-AuthAs: Internal
/^From:/i PREPEND X-MS-Exchange-CrossPremises-AuthSource: smtp.yourdomain.com
Once all the files have been created, we need to run the postmap command on the non-pcre maps
$ postmap /etc/postfix/esmtp_access
$ postmap /etc/postfix/mynetworks
$ postmap /etc/postfix/tls_policy
$ postmap /etc/postfix/transport
Now it’s time to configure Postfix and wire it up with Fuglu and Certbot! Here is a replacement main.cf file annotated with explanations where appropriate:
# See /usr/share/postfix/main.cf.dist for a commented, more complete version

compatibility_level=2

smtpd_banner = $myhostname ESMTP $mail_name

# New mail notifications aren't necessary on a relay box
biff = no

# appending .domain is the MUA's job.
append_dot_mydomain = no

# Adjust hostname as necessary; this should be the hostname of the machine, not your mail domain
myhostname = smtp.yourdomain.com

# Configure the aliases (system defaults)
alias_maps = hash:/etc/aliases
alias_database = hash:/etc/aliases

# Set the origin and destination
myorigin = /etc/mailname
mydestination = localhost.localdomain, localhost

# Some mailbox settings
mailbox_size_limit = 0
recipient_delimiter = +

# Where and how it should listen, adjust these if you need
inet_interfaces = all
inet_protocols = all

# Use the files we created earlier
mynetworks = cidr:/etc/postfix/mynetworks
transport_maps = hash:/etc/postfix/transport
header_checks = pcre:/etc/postfix/header_checks

# 150MB Message Size Limit (same as Exchange Online)
message_size_limit = 157286400

# Some SMTPd settings for authorization, where to filter emails to and if incoming connections need adjustments
smtpd_relay_restrictions =
    permit_mynetworks permit_sasl_authenticated reject_unauth_destination
smtpd_client_restrictions =
    check_client_access pcre:/etc/postfix/filter
smtpd_discard_ehlo_keyword_address_maps =
    cidr:/etc/postfix/esmtp_access

# SMTPD TLS Settings (for receiving connections)
# Adjust the path of the letsencrypt cert as appropriate, don't change privkey.pem or fullchain.pem file names
smtpd_tls_security_level = may
smtpd_tls_auth_only = yes
smtpd_tls_key_file = /etc/letsencrypt/live/smtp.yourdomain.com/privkey.pem
smtpd_tls_cert_file = /etc/letsencrypt/live/smtp.yourdomain.com/fullchain.pem
smtpd_tls_dh1024_param_file = /etc/postfix/dh2048.pem
# Note protocols and ciphers below; these are strong security settings, weaken at your discretion
smtpd_tls_protocols = !SSLv3, !SSLv2, !TLSv1, !TLSv1.1
smtpd_tls_ciphers = high
smtpd_tls_exclude_ciphers = aNULL, MD5, EXPORT
smtpd_tls_mandatory_protocols = $smtpd_tls_protocols
smtpd_tls_mandatory_ciphers = $smtpd_tls_ciphers
smtpd_tls_mandatory_exclude_ciphers = $smtpd_tls_exclude_ciphers
smtpd_tls_received_header = yes
smtpd_tls_session_cache_timeout = 3600s
tls_preempt_cipherlist = no
tls_random_source = dev:/dev/urandom

# SMTP TLS Settings (for connecting to Microsoft 365), tls_policy is used to enforce TLS to 365
# Adjust the path of the letsencrypt cert as appropriate, don't change privkey.pem or fullchain.pem file names
smtp_tls_policy_maps = hash:/etc/postfix/tls_policy
smtp_tls_cert_file = /etc/letsencrypt/live/smtp.yourdomain.com/fullchain.pem
smtp_tls_key_file = /etc/letsencrypt/live/smtp.yourdomain.com/privkey.pem
smtp_tls_CAfile = /etc/ssl/certs/ca-certificates.crt
master.cf also needs a few tweaks in order to work properly as well. The first line below will enable the submission port (587), the second adds fuglu connectors in Postfix. Note that this does differ a bit from the official Fuglu configuration documentation, but I found this config to work well.
$ sed -i 's/^#submission/submission/g' /etc/postfix/master.cf
$ grep -qo fuglu /etc/postfix/master.cf || cat <<EOT >> /etc/postfix/master.cf
#fuglu
fuglu   unix  -       -       n       -       10      smtp
      -o smtp_send_xforward_command=yes
      -o disable_mime_output_conversion=yes
#
localhost:10026 inet  n       -       n       -       10      smtpd
      -o content_filter=
      -o receive_override_options=no_unknown_recipient_checks,no_header_body_checks,no_milters,no_address_mappings
      -o smtpd_helo_restrictions=
      -o smtpd_client_restrictions=
      -o smtpd_sender_restrictions=
      -o smtpd_recipient_restrictions=permit_mynetworks,reject
      -o mynetworks=127.0.0.0/8
      -o smtpd_authorized_xforward_hosts=127.0.0.0/8
EOT
Once all of this is in place, give Postfix a quick reload to use the new configuration:
$ systemctl reload postfix
Connecting to Microsoft 365
Now that everything on our server is complete, it’s time to set up our connection to Microsoft 365. We will be loosely following Microsoft’s inbound and outbound connectors documentation.
SMTP relay lets Microsoft 365 or Office 365 relay emails on your behalf by using a connector that’s configured with your public IP address or a TLS certificate.
The advantage of this option for us was simple:
- We needed email to come FROM any potential address on our domain, not a particular account (eliminates option 1)
- We needed to send email outside the organization (eliminates option 2)
Inbound Connector
The inbound connector allows our Postfix server to send emails through Exchange Online.
-
Sign in to the Microsoft 365 Exchange Admin Center
-
In the Exchange admin center, go to Mail flow > Connectors.
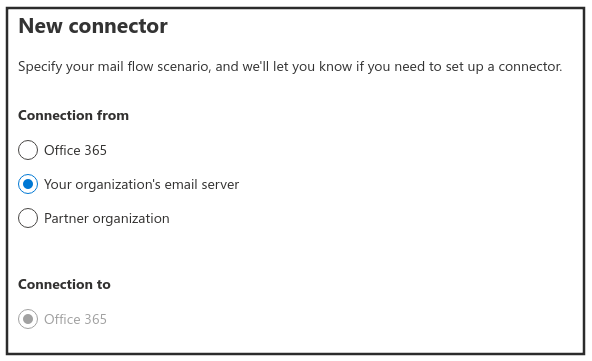
a. To start the wizard, click the Add a connector button. On the first screen, choose the options that are depicted in the following screenshot and click Next:
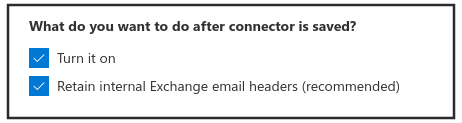
b. Give your connector a name and brief description. If not already checked, check both options to enable the connector and retain internal headers and click Next.
c. Enter the common name of the certificate you created above in the box under the first option as shown below and click Next:

d. Review everything to ensure its setup correctly and click the Create connector button.
-
Now that you are done with configuring your Microsoft 365 settings, go to your domain registrar’s website to update your DNS records. Edit your SPF record to include the public IP address that your email will come from. You cannot use dynamic IP addresses here, you must have a static address. Consult with your network team to either assign a static WAN address to your Postfix server or utilize your existing WAN IP. You can run
curl -s icanhazip.comto find your IP address of your Postfix server if needed. The finished string should look similar to thisv=spf1 ip4:8.8.8.8 include:spf.protection.outlook.com ~all, where8.8.8.8is your public IP address. Skipping this step can cause email to be sent to recipients’ junk mail folders.
At this point you should now have a fully functioning mail flow. There are two ways you can/should test. First is via telnet for non-TLS-based connections, the second is via openssl for TLS-based.
Testing the complete process
To connect via telnet, use something similar to the following:
$ telnet smtp.yourdomain.com 587
For testing STARTTLS, use openssl like so:
$ openssl s_client -connect smtp.yourdomain.com:587 -starttls smtp
Once connected, you can start issuing commands (lines prefixed with >> you should manually enter, without the >>, this applies to both telnet and openssl):
220 smtp.yourdomain.com ESMTP Postfix
>> EHLO smtp.yourdomain.com
250-smtp.yourdomain.com
250-PIPELINING
250-SIZE 157286400
250-VRFY
250-ETRN
250-STARTTLS
250-ENHANCEDSTATUSCODES
250-8BITMIME
250-DSN
250 SMTPUTF8
>> mail from: no-reply@yourdomain.com
250 2.1.0 Ok
>> rcpt to: you@yourdomain.com
250 2.1.5 Ok
>> data
354 End data with <CR><LF>.<CR><LF>
>> To: you@yourdomain.com
>> From: no-reply@yourdomain.com
>> Subject: Test Email
>>
>> Test Body
>> .
250 2.0.0 Ok: queued as 589C38068C
>> quit
221 2.0.0 Bye
Connection closed by foreign host.
If everything goes well, you’ll end up with some emails in your inbox to validate your test. If they don’t go through, you’ll need to start digging through logs. Some meaningful logs on the Postfix server include:
- /var/mail.log
- /var/mail.err
- /var/log/fuglu/fuglu.log
Additionally, if Postfix shows that the emails have left the box, you can check Message Trace on the Exchange Admin portal.
Wrapping up
Now that you have a fully functioning connector, all you need to do is update any devices that need to send through Exchange to use your new Postfix server. It’s recommended to point them to port 587 and use TLS where you can. Otherwise, you can use port 587 without TLS, or port 25 if your client doesn’t support 587. No authentication is necessary as well.
In short, we walked through installing Postfix with Fuglu for antivirus scanning, DKIM signing and archiving and connected it to Microsoft 365 in a way that allows us to send emails from